
Zazzle is a great way of bringing in extra income, with earnings paid out at around the middle of every month!


If you've got old artwork files lying dormant on your computer, put them to good use where they can earn you money.
You don't have to, but if you want to sell what you design, first of all Sign Up as a Designer. (It's free.)
How to Create a Zazzle Product to Sell...
For this example, I am going to put one of my cartoon images, plus some text, on a mug.
So, go to the "Create your own" menu, (top left icon on the Zazzle home page), and click on "mug".

You will now have a choice of blank mugs appear. Here we'll select the Classic Mug.

The mug appears, ready for you to start designing. You can now add one of your images by clicking the "Add Image" button.

You can upload an image from your computer or, if you've already uploaded images into your Zazzle image folder, select one of those.
For this example, I am going to select an image of a man about to go skiing, which I already have in my library.

With the image now showing on my design work area, I resize it, and drag it to position it in place. The image that shows within the blue border is what will appear on the mug. I want it to appear on both sides of the mug so I firstly drag this image across to the side. You'll notice that I'm happy to crop off the top and bottom in this instance.

Because I want to have the image on both sides of the mug, I copy it by going to "select all"...

I then "copy"...

And finally "paste"...

The image will paste at exactly the same size and in the same position, so just drag it across to where you want it to appear.

I am now going to add some wording - in this instance a name, which can be personalised. Simply click the "Add Text" button.

A box will appear, and you add the wording you want in this box. I'm adding the name "Christopher".

Click "OK" and the text will appear on your design. Now we need to choose a font, as well as a size and colour.

I've now changed the font to Ad Lib. Next I click the small rotate anti-clockwise icon to the right. Click twice for 90 degrees. I also change the font size to one that is suitable.

Because I want the purchaser to be able to change the name to one of their choice, I slide the button which reads "Make this a template object". In the box that then appears saying "Product page label" I put a short description that will appear on the purchasers page, to help guide them into what they have to do. In this instance I write "Your Name Choice".

There are many other things you can do, such as change text colour, background colour, add shapes, etc., but for this example I am happy with what I have designed, so I click the button at the top right that says "Done".
 |
| Add caption |
Now a new page opens up. In this page we can give the product a Title, and also a Description, plus all-important Tags. There are also some other fields to check, such as department. Zazzle will usually suggest this automatically.

Once I've filled in the Title and Description, I need to add Tags. This is important. Without appropriate tags, no one will be able to find your product when searching on Zazzle.

You can select options for occasions (e.g. Christmas) and types of person (e.g. Doctor), for whom the product is suitable, but we don't need to here as it is suitable for everyone. You do need to give it a "category" in your store. I have created a category called "New Products" and am assigning it to that.

Finally, set the audience suitability, and the commission that you want from the item. This is what you will earn from a sale. Be advised that Zazzle regularly offers discounts to buyers, with sales codes, and sometimes your earnings will reflect this.

Once this is all done it's time to "Post It" for Sale!
Your fantastic new mug appears, ready for a buyer to personalise and purchase. Note that Zazzle has automatically placed some useful little Sharing Buttons underneath.
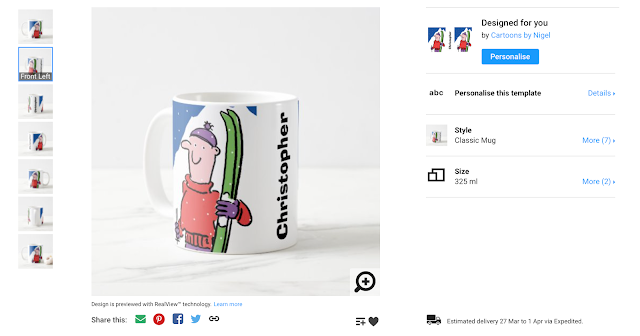
If you want to make your own mug, using the above design as a template, click the image, or this link.
I hope this has been helpful. You can sign up with Zazzle and start making money from your own designs and creations by clicking This Link or the banner below...

See more of my cartoons at www.nigelsutherland.co.uk
If you liked my post, please share via the buttons below. Thanks!
No comments:
Post a Comment